


Hein
-
Content count
185 -
Joined
-
Last visited
-
Days Won
17
Posts posted by Hein
-
-
Should be pretty much the opposite of surf right. So just set the tabs opposite. And CATs to the opposite angle.
All the best,
Hein
-
New Ri245 will have closed cooling and updated 'baller' ramfill valves.
Wave is nice:
All the best,
Hein
-
We own a 2021 Ri245. Great boat. Ours has the ZR7 but the ZZ6 is also a great engine. ZZ6 is the minimum I would accept. Talk to Acme about props as depends on your elevation. No huge difference between 2021 and 2023. The new models have the new 'baller' Ramfill valves and also a small additional screen on the right side of the dash. Other than that not much. Rear thruster is a factory option but the aftermarket thrusters are better.
All the best,
Hein
-
Boat sold last year. Now starting work on our Ri245 and posting about that at the Centurion Facebook group.
All the best,
Hein
-
boat has been sold. Excited for our 2021 Ri245 to arrive next year.
-
 1
1
-
-
-
I have some extra brackets for mounting the rear view camera display to the dash of a newer Centurion. Should fit most models. I am happy to send those to you. PM me with your address.
Our Fi25 is for sale because we have ordered a new Ri245 for next year. Please PM me for details and price.
All the best,
Hein
-
I've got the stock tanks that came out of our 2008 Enzo. But would also suggest bags. Take a look at the build thread I did on our boat to for some ideas.
All the best,
Hein
-
You need to remove the prop and V-drive coupler flange to pull the shaft. It's a taper fit so a puller will be needed. The rudder may need to come off to get the shaft out. Probably not a bad idea to get a shaft alignment done at the same time. And replace the strut bushings. Not the easiest job since you are upside down working in the bottom of the boat with limited access.
All the best,
Hein
-
3M 90 spray adhesive. It's a contact cement so spray both surfaces, wait a minute, then press together. Works great on carpet.
All the best,
Hein
-
1
-
-
The camera is designed to be mounted on the rear of an automobile so it won't be effected by moisture. We drip water on it and get it wet when switching riders. We did have a problem with the cable so the Amazon seller sent us both a replacement camera and cable at no extra charge. There is some risk of the display getting wet but we tend to be out it fair weather. It stays dry. We are very happy with the setup. You can pan the screen up/down so very easy to center the display vertically depending on what we are doing behind the boat. One reason for mounting the camera where I did was because it was easy to route the cable to it.
All the best,
Hein
-
Hello drance, Sorry you weren't able to reach me. Please call or email me directly.
All the best,
Hein@DIYvan.com
541 490 5098
-
Sorry I missed your posts Packrat and bomoseen avy. The bow bag was under the seats. There can be some sharp fiberglass under there so we smoothed that out and added some EVA pads to protect the bag from punctures. I added another pump to fill it and also had the same pump plumbed to a hose bib in the back so we could use it to fill a bag we laid on the back seat. We always ran with all bags full and boat sat mostly level unless we had a bunch of crew. They would sit on the surfside. Rubrail would barely touch the water at the rear corner while surfing.
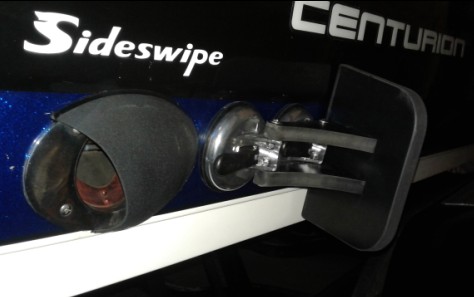
I made my own suck wedge and it was placed just ahead of the sideswipe. That really helped clean up the lip of the wave. below is a photo of it installed. I still have two of the suck wedges that I would sell for $75 each. They are small and float but we never had one come loose.
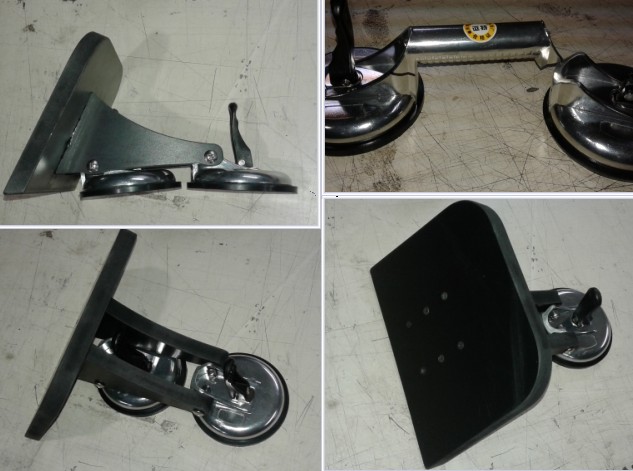
Here is a collage of how it looks and is constructed. I would be happy to CNC the parts so you can get the handle and build it yourself. $50 for the parts. If interested, send me a text or email me at Hein@DIYvan.com
All the best,
Hein
541 490 5098
-
A few posts up are the drawings I released to wakemakers.
All the best,
Hein
-
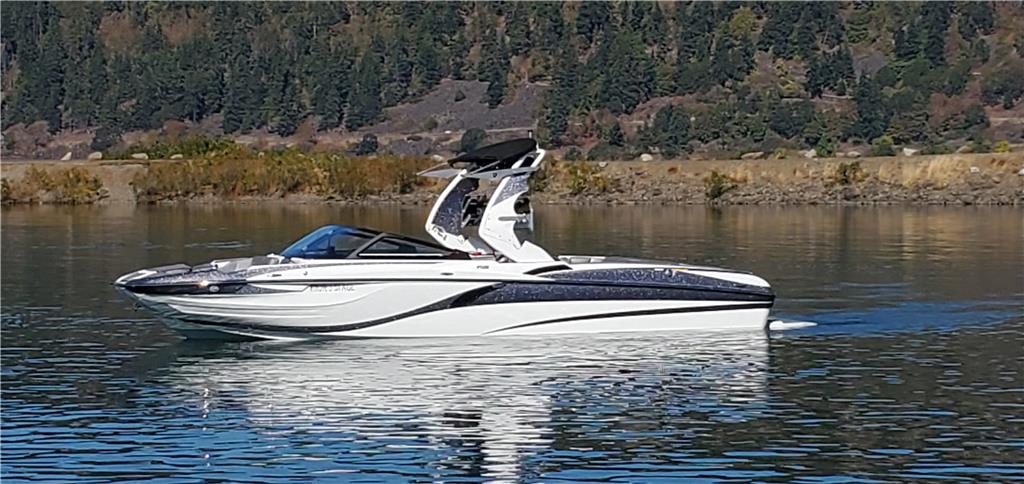
Beautiful boat. You can't go wrong with a Centurion. You might look at the Fi but either one will have you smiling on the wave these machines are capable of throwing up. Make sure it has RamFill so you can easily fill and empty the ballast.
All the best,
Hein
-
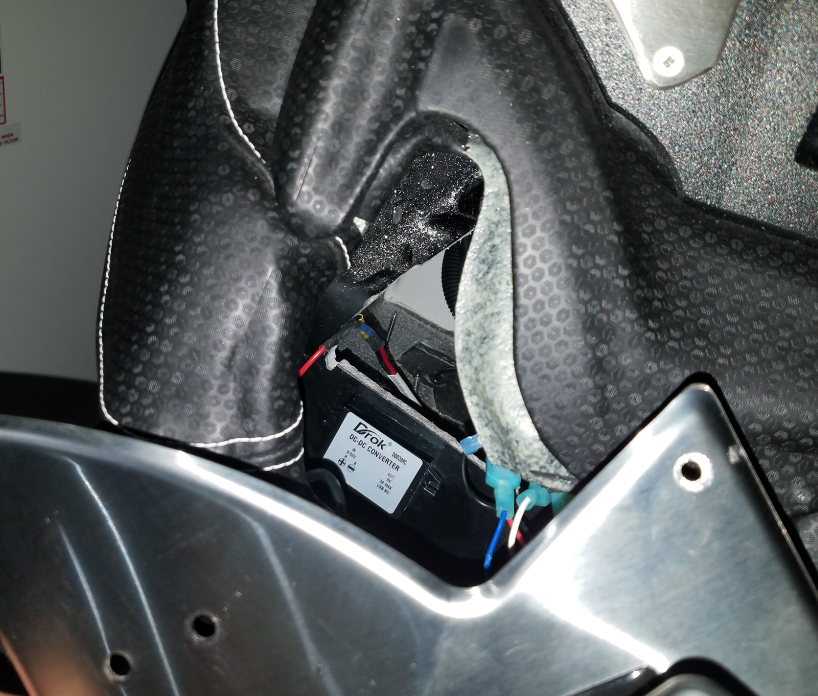
Great having a Bluetooth interface for the audio system but phone would run out of power after a few hours on the water. Updated the phone holder to one with a wireless charger. I cut the post off the back of the holder, sanded it smooth and used VHB tape to attach it to the dash panel. Mounted the 12V to 5V converter inside the dash with some more VHB. Connected wires to positive post and negative buss bar in front of dash located behind starboard front seat back. With a 5A fuse to protect the circuit. Works great. All the best, Hein
New phone holder mounted. Here is the one I used: https://amzn.to/2McGEJo
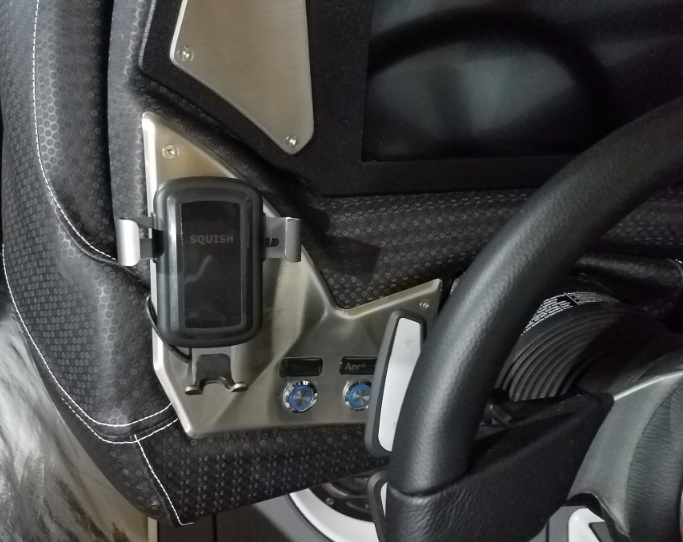
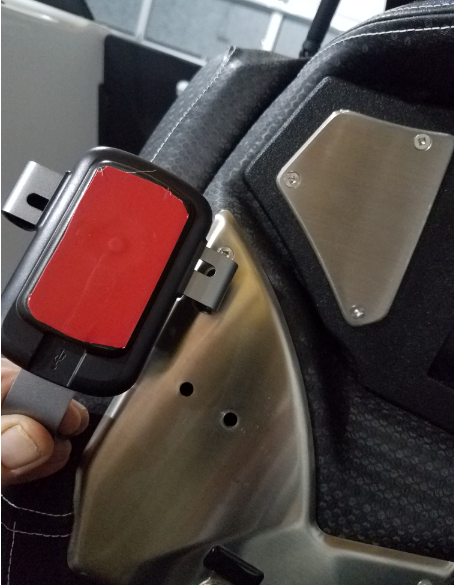
VHB tape to secure it to the dash panel. Holes are for factory supplied holder which I removed.
Below. Drok power supply mounted behind dash with more VHB tape. This 12v to 5v converter: https://amzn.to/2VLuDdq
-
Thank you for sharing the settings. Will give those a try next time we ride.
Kim just released our board rack supports to our Ebay store. This was a CAD project completed by a paid summer intern we had working for us last summer. Locally made right here in Oregon.
They are designed to be mounted to common unistrut which is convenient because then they can be adjusted up and down as needed to accommodate thickness of board and the length of the fins.
All the best, Hein
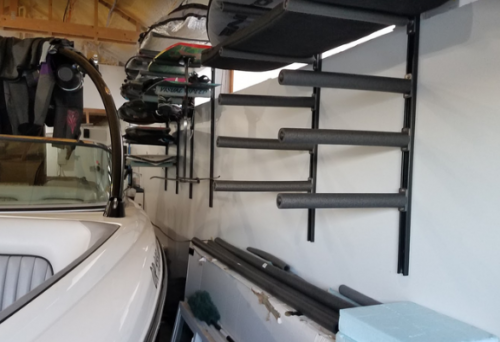
https://www.ebay.com/itm/Board-Racks/143259723364
-
1
-
-
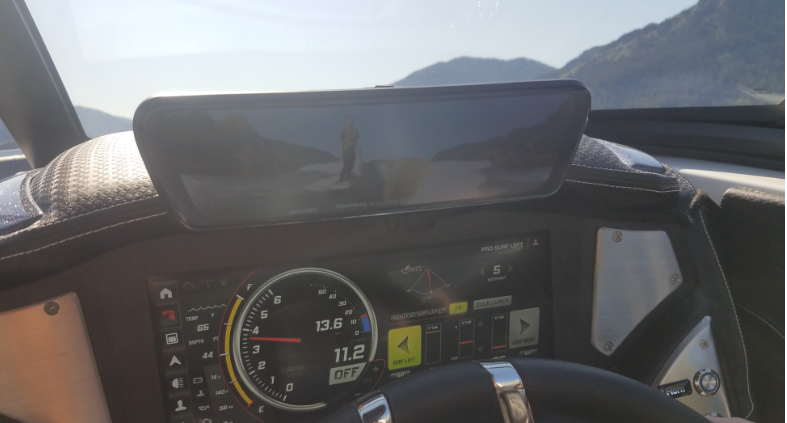
One more photo of the rear view camera in use. I'm not sure the image wouldn't be better without the glare film but it's a keeper none-the-less. Driver is totally able to monitor the rider while still looking ahead. You can also see that we don't use cruise control due to the constantly varying magnitude and direction of the current in the Columbia river. GPS based speed control will absolutely not work for us. We ride by the using the tachometer. A smidge over 3600 rpm seems perfect for us. GPS speedometer can be as much as 3mph off depending on whether we are going upstream/downstream or at some angle across the flow. We were seeing 2-3 mph while floating at idle.
If anyone else wants to try one then I would be honored to machine some of the brackets I used to install it. They are mounted with 3M VHB tape so should be removable with no damage the dash itself.
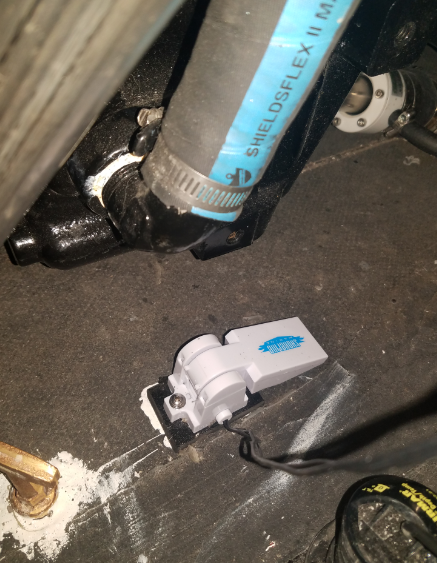
Below are a couple photos of the bilge alarm install. The float switch is on the ground side of the alarm so just needed one wire going back. The alarm is secured under the dash with VHB and power wire goes forward from there to the positive post where the breakers are. I made an inline fuse holder with two flag style crimp terminals and stuck a 3A ATC fuse in. I ran the switch wire to the rear from the dash via the space behind the panel next to the driver (where throttle is located) until it emerged under the seats in back. Then just ran it along the back of the under seat storage towards the rear and then down into the bilge near the V-drive. Other lead from switch is grounded to the engine. I used the same wire routing for the rear view camera cable.
Below. Fuse holder behind dash.
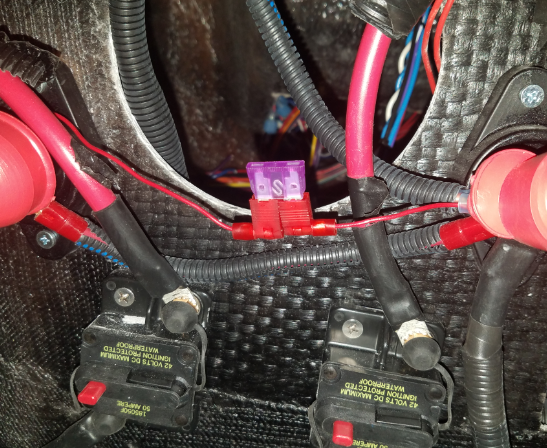
Next couple photos. Buzzer is up under here:

I like to keep the bilge ventilated with a box fan when the boat is in storage so moisture can dry out. I open up a seat back in front and also the fuel tank sender hatch. Flow-thru air comes out in those locations. The 18x18 furnace filter on top of the fan keeps dust from being blown in. Fan runs 24/7.
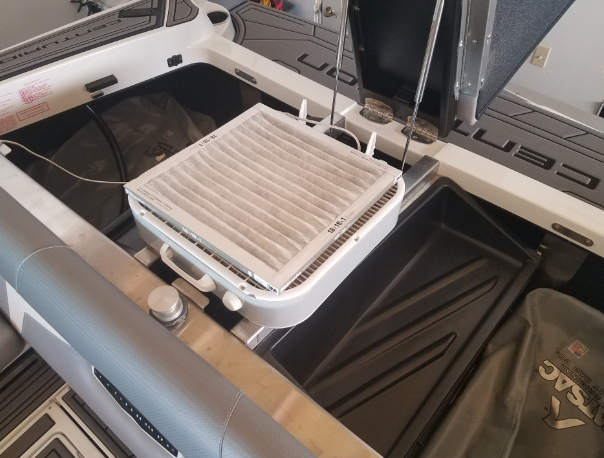
All the best, Hein
-
2
-
-
-
We got the wave looking really solid today. More crew (5) so 3 sitting on the surf side, bow bag at 40%, starboard pnp at 60% every thing else full. Then 0,50,85 for tabs and stinger, cats at 5. Videos coming shortly. We captured ourselves on one of the Gorge web cams. Great day! All the best, Hein

-
1
-
-
Here's another video with a pretty Gorge afternoon sky.
-
Thank you for the insights, Infinity. And for the compliment regarding the CNC. Having the machine is great but it's actually the engineer coming up with the design and doing the programming (yours truly) that makes good parts with it.
Believe we have all the ballast options on this boat including transom bag across the back. We had tabs set to 0 and 60 with stinger at 40. Cats was at 30. We will try again with cats set to 0. We did have a cleaner wave when we just started out but then started changing the settings and lost it while we were riding.
-
Water temperature is finally getting comfortable so glad to be out again today. Rear view camera worked well and was easy to see and use. Anti-glare film I applied did help. Photo below doesn't really do it justice. Driver's view is much better. This was late afternoon heading east.

I think we had better luck with the wave today. We were light on crew with only 3 on board. I moved the 400lbs of lead from underneath the bags in the rear lockers to under the rear most seats. 200lbs on each side. All bags were full except for the starboard rear which was at about 60% iirc. Tabs were 0 and 60 with stinger at 40 and cats at 30. We ran into some funky current whirlpool/eddies which totally ruined the wave when I was riding. Here is a video of Sean riding.
I'll have more footage to share tomorrow...
All the best, Hein
-
I wasn't aware that we could display the rear view cam on the dash screen. Still, I think a separate monitor will be best because we want the whole dash screen to be available for making adjustments to the wave setup. I did put the anti-glare film on the rear view monitor which I think will help in the sun. I discovered that I could pan up and down on the screen so that will help if I didn't get the camera pointed quite right. Excited to try it out but haven't had a chance to get out on the water again. I did also purchase a microSD card so we can record our rides. That is also and added bonus we have with the dedicated monitor. All the best, Hein
Dialing in the Wave Ri245
in Centurion Boats General Discussion
Posted
We had a 2021 Ri245 and recently upgraded to a 2023. We run all ballast full (our boat has all of the bags). We also have eight 50lb bags of wakeballast on board. 2 on each side ahead of the bags beside the engine, 1 each rear corner beside the transom bag, 1 in storage area next to batteries and one next to the trash bin. Keep filling the Ramfill until you see water coming out of the overflows on the sides of the boat. We use pro-surf factory settings which I believe are tabs 0 surf side, 85 non surf side, 15 stinger and 10 deg CATS. Common recommendation is to empty ramfill opposite rider to 85% while underway. You can shorten and lengthen wave with stinger. CATs can help clean up the lip. Get used to making tab, stinger and CATs adjustments while underway and watching for change in the wave. That will give you insight on which settings do what. Wave can change with number of folks on board and where they are sitting. Water depth can also have an effect. Deeper is better.
All the best,
Hein