JJOcean
-
Content count
86 -
Joined
-
Last visited
-
Days Won
11
Everything posted by JJOcean
-
Love the mods! On the phone charger mount, how did you go about re-routing the power cord? Did you solder off the the wires from the circuit board inside the charger housing, mount the circuit board behind the dash, drill out a small hole in the back of the charger housing and run new wire from the circuit board that's now outside the housing behind the dash to the soldered off wires inside the housing? I'm really tired of my phone ending up all over the place, so would definitely want to do something similar - just curious of your method. Thanks!
-
Last things done to be ready for summer
JJOcean replied to InfinitySurf's topic in Centurion Boat Accessories, Electronics and Modifications
Cans - I'm guessing 3-4 cans.The coats are real thin, but you can put down several coats per can ... depending on how wide you overspray. Tape - I looked around a lot and settled on T.R.U. DC-PEF12P Black Double Coated Window Glazing Tape: 1/8 in. thick x 1/2 in. wide. Wide operating temp range. Worked fine. Was looking for something with more rubber in it, but couldn't find it. I would use this tape again on it. OEM clear - talking about the clear that came from the factory. -
Last things done to be ready for summer
JJOcean replied to InfinitySurf's topic in Centurion Boat Accessories, Electronics and Modifications
Finally took some pics of the vents after the new clear while I was out this weekend. Real happy with the results. Might be hard to see in the pics, but any areas that might have been slightly blurred are completely clear now. Also, the OEM clear seemed to have a little yellow tint to it. The new automotive grade clear is crystal - no tint ... almost of hint of blue which matches my boat even better. More likely is that the clear is picking up the hue of the gel coat that the OEM clear didn't. Anyway, very happy with the results. Just a pain to remove, sand, clear and remount. The real test is how long it stays like that. -
Last things done to be ready for summer
JJOcean replied to InfinitySurf's topic in Centurion Boat Accessories, Electronics and Modifications
I only went down to 1200 ... wet sand. Probably overkill. I used Eastwood's 2K AeroSpray High-Gloss Clear. Sprayed out well, but wasn't as thick as I wanted, so dropped it off at the auto body shop that does all my cars' paint and had them do "multiple coats of clear ... for a boat, so it will see a lot of sun and water". Don't know for sure, but guessing they did 5-6 coats. I could have ordered more cans and done it myself, but was travelling a lot and wanted to get it done sooner than later. -
Last things done to be ready for summer
JJOcean replied to InfinitySurf's topic in Centurion Boat Accessories, Electronics and Modifications
I ended up taking them off, removing the old seals, sanding them down a little with fine grit and then putting several automotive grade clear coats on them. I reinstalled them last week. They look great - even better than right after I would polish them. Time will tell how long they stay that nice. Here's the before photo. I don't have an after photo ... will try to take one this weekend then post. I also ended up re-seating the screen on both sides since they popped the glue spots in a couple places and were sagging a little lower in some spots (previous owner must have stepped on them a time or 2). Used JB Weld to adhere screen back to CF backing. -
Exhaust Hose Partially Slipped Off
JJOcean posted a topic in Centurion Boat Maintenance, Performance, Troubleshooting
I was out on the lake most of the day and about to finish up about 3 hours of surfing when I notice the exhaust note changed as I was sitting idle while changing riders. Flip up the back cushion ... more exhaust note and exhaust smell immediately noticed, plus more water than normal and i could tell the water in the bilge was moving around a little. All not normal. Could easily tell the exhaust output was partially discharging into the engine bay. Of course I'm sitting there with full ballast. Thankfully I was close to the dock. Once back and up on lift I was able to tell the large exhaust hose (guessing 4" diameter) that runs along the bottom of the hull had partially slipped off from the hard fiberglass U tube (my term for it). Basically, coming off the port cat it has a short ~6" rubber exhaust hose that then attaches to the "hard U tube" that then attaches to a +36" rubber hose and ultimately to the flapper down the line. It was the connection between the u tube and the +36" hose where it partially slipped off. Both the hose clamps were completely loose too. It also looks like the other side of the u tube that is connected to the ~6" hose had slipped some too, but it didn't slip off. Those hose clamps were fairly tight, but I loosened them in the pic in an attempt to get the lower hose back on. Any tips on getting the hose back on? It is a real PITA. Very tight quarters, rigid hose and the U tube has very little play - even after I loosened the top. Shot of lower hose seperation Shot of top hose slip - no seperation -
Exhaust Hose Partially Slipped Off
JJOcean replied to JJOcean's topic in Centurion Boat Maintenance, Performance, Troubleshooting
Got it back on. As stated by you guys above, just required me putting my big boy pants on and recruiting a second person to apply the pressure to keep the U tube aligned while I finagled the hose back on. 1 person can't do both of those things at the same time. A lot of sweat, body contortions and 6 bloody knuckles was the cost. As for how it happened, I think the hose clamps were never on tight or at some point were loosened and never re-tightened and it just slowly slide off over time. Where the hose slipped off - those 2 hose clamps were completely loose to the point I could easily spin them (and the screw) by hand. The ones on top were tight, they just show loose and moved in the pic I took because I loosened them up with a screw driver in an attempt to get it back on. I did find a post on here from 2010 when searching "exhaust hose", where somebody had a brand new boat where this same thing happened right after delivery and they concluded somebody at the factory never tightened the hose clamps. I don't know if that was the case with my boat, but it is certainly one of the possibilities. My recommendation is for you guys to check the tightness of your hose clamps the next time you go out. -
Gladiator Towe Custom Surf Rack
JJOcean replied to LakeSurfer's topic in Centurion Boat Accessories, Electronics and Modifications
I had templates for the pockets, but my bimini top angles up, flat for a little bit and angles down. I really didn't realize how much curve was up there until I laid my board up there. When I laid the templates out on the top, there were just too many curves for it to work well. The newer style biminis are really straight/flat and work well for pockets. I like the pockets, just couldn't figure out how to make them work well for my top. -
Gladiator Towe Custom Surf Rack
JJOcean replied to LakeSurfer's topic in Centurion Boat Accessories, Electronics and Modifications
Yes - I will have to stand on the gunwales to get the boards on/off. Yes - I have to take the racks off to take the bimini down. All trade-offs I made. My deciding factors were: I'm 6'4", so no way they could they go under - already hit head on inner speakers from time to time. As for the bimin, it stays up for us all season, so I wanted as clean and small as openings as possible. If I was trailering the boat I would have gone the zipper route. -
Boat Pulling Left After Rudder Swap
JJOcean posted a topic in Centurion Boat Maintenance, Performance, Troubleshooting
So the short of it is that my silver adjustable component within the middle of my rudder came out and fell to the bottom of the lake 6 weeks ago (like several others on here). The boat rode and tracked fine without it, but I had it replaced 2 weeks ago under warranty when I knew we wouldn’t be out on the boat. I put the boat back in the water with the new rudder and the boat pulls significantly to the left when at cruising speed (25mph). Video of the tracking issue … wheel has to be turned a little right to keep straight and when I let go turns left - https://youtu.be/Fj0mEny2Q7c. Never did that with my other rudder – very straight when I let go with or without silver tunable rudder component. I’ve adjusted the silver component on the new rudder to compensate for the pull, but it has little effect even when at a pretty severe angle. I even tried it in the opposite direction and it had very little change. I also know I could grind the rudder on the right trailing edge, but I’m not sure it is really a rudder problem at this point – so don’t want to go that route yet. After looking at everything top to bottom - it seems like my CATS might be not centered even though it says it is centered @ 50. While cruising, I can pretty much straighten it out by setting CATS to 70 with just me in the boat (no ballast). Never had to do that before. The dealer did break the wheel off my trailer jack when they lifted the rear of the boat to remove the rudder (they’re in process of putting on new replacement jack). I asked them if the CATS fin got bumped when that occurred. They said no. What do you guys think? Attached photo of my CATS on lift with it saying it is centered, but looks like it is pointing left to me. Also, I’ve attached a view of the wake with CATS at 50, but you can see how the wake is washed over. Could the rudder really do that or is it the CATS? To add insult to injury, my local dealer is saying they aren’t comfortable “tuning” the rudder after getting instructions from Fineline and had Fineline refer me to an out of state dealer (next closest) to have the issue fixed. That’s why I’m looking for additional input at this point … regretting making the rudder change at this point. -
Boat Pulling Left After Rudder Swap
JJOcean replied to JJOcean's topic in Centurion Boat Maintenance, Performance, Troubleshooting
No ... not much science there. I've attached the "official tech spec" for this procedure. I kind of laughed when I first read it, but appreciated them sending it. Obviously, if you've done it a couple times before you'd have a lot better idea of how much to take off based on the amount of pull. Definitely a rinse & repeat until you like the result ... and better to error on the side of not grinding off too much. And yes, I have a window rudder, but the rudder needed way more adjustment than what the "window deflector" could adjust. Mine is adjusted now to the point the rudder is dead straight. No adjustment needed on the "window deflector". -
Boat Pulling Left After Rudder Swap
JJOcean replied to JJOcean's topic in Centurion Boat Maintenance, Performance, Troubleshooting
The bolt was not OEM (smaller diameter) and it caused the mounting hole in the actuator to wear out in an oblong fashion, so even when I got the correct bolt installed there would still be play. Not sure if it was the previous dealer or previous owner who put the non-OEM bolt on there. Much appreciation to Fineline - they stood behind it and replaced the actuator and bolt. -
Boat Pulling Left After Rudder Swap
JJOcean replied to JJOcean's topic in Centurion Boat Maintenance, Performance, Troubleshooting
Updating post with final resolution in case anybody else runs into this.. Obviously, the CATS needed to be fixed. However, it had zero effect on the boat pull. It ended up that the brand new rudder needed to be adjusted (with a grinder on the trailing edge). More grinding than I expected. New dealer got it adjusted right. -
Gladiator Towe Custom Surf Rack
JJOcean replied to LakeSurfer's topic in Centurion Boat Accessories, Electronics and Modifications
Finally got the boat back from the dealer this week ... took forever on parts, some parts missing, wait for second shipment, etc. All working as it should now. Anyway, got the racks mounted. I hope to use them this coming weekend. -
Last things done to be ready for summer
JJOcean replied to InfinitySurf's topic in Centurion Boat Accessories, Electronics and Modifications
CF vents look great. Let me know how long they stay looking like that? Can't remember the product I've been using, but they turn out great after application, but they loose shine after 2-3 outings. Was thinking the only real way to fix it was to take them off and put a high quality clear coat on them. -
Sent you PM
-
What city are you in? Doesn't say on your profile. There was a dealer change here in Atlanta over the fall, so I can give you info/experience on the change if you're in Atlanta.
-
Gladiator Towe Custom Surf Rack
JJOcean replied to LakeSurfer's topic in Centurion Boat Accessories, Electronics and Modifications
The threaded 2" x 1/2" bolts are the only thing that holds the spacer & racks on - bolt simply passes through the rack & spacer (neither are threaded). You back that bolt out of the tapped hole in the tower - everything is completely disconnected from the tower. My plan is to put the bimini up without the racks on. The bimini has 4 1.5" holes cut & hemmed exactly where the tapped holes are & the spacers go - 1/2" extra clearance in the bimini holes for buffer. Once the bimini is up, I place the spacers up there one at a a time in each opening, put the rack on top of that & feed the bolt through both the rack/spacer and into the threaded hole in the tower to secure everything. I'll thread the bolts loose one at a time & then tighten down once they are all in. If I every need/want to take the top down - I just remove the bolts and the spacers/racks are disconnected. I just need to hold onto the spacer & rack when I pull the bolt out to make sure they don't slide down the side of the bimini and into the water I'll take pics of it all once I get my boat back from the dealer - pics will probably make it a little clearer. -
Gladiator Towe Custom Surf Rack
JJOcean replied to LakeSurfer's topic in Centurion Boat Accessories, Electronics and Modifications
The risers are just 1" diameter aluminum drilled out 1/2" in center, angle cut to match tower drop, and a 1" weather-resistant EPDM rubber sealing washer (-20 to 212 deg. rated) on either side. I have a 2" long stainless steel 1/2" diameter bolt that passes through the rack, washers & risers into a 1/2" tap on the tower. You can see the "button" head of the bolt in at least 1 of the pics - allen head indention. I also had to drill out the rack slightly to pass the 1/2" bolt, but the drill out will also prevent any sliding of the rack which I wanted. I checked the cross bar clearance like 4 time before I tapped the tower. Nothing like a little pucker factor drilling 4 1/2" holes in a perfectly good tower! I too ended up going wider than planned. The tow rope won't be an issue for surfing. I expect I might have an issue wake boarding with boards up there, but I mostly surf & made the compromise. If I went out another 4" I probably could have completely resolved the wake boarding issue, but the tower really starts dropping off fast on that part of the tower. I doubt you'll have an issue with the tow rope in your setup given the height of your mounts. Definitely like the functionality you put into yours. I was trying to make mine as low profile as possible, but I had to take the tow rope limitation as a potential trade off to do it. -
Gladiator Towe Custom Surf Rack
JJOcean replied to LakeSurfer's topic in Centurion Boat Accessories, Electronics and Modifications
I'm in the process of mounting 2 of Piper's rack up top on my Gladiator tower. I've got 4 speakers and lights all mounted on the tower now, so out of room under. Plus I'm 6'4" and I bump my head from time to time on my inside speakers ... would hate to catch my melon on a board. Boards will be up top with socks on. Here's a couple shots of the base install. I went with bigger bolts (1/2" diameter) since I'm offsetting the mount points on just the back side of the racks. Since those pics were taken, I've powder coated the racks and spacer mounts black to match the tower. I also just got the bimini back with 4 holes hemmed to allow the spacer mounts to pass through. My boat is at the dealer right now getting my tracking trued up after a rudder replacement. Once I get it back, I'll mount every thing and post some pics of the final install. Top quality racks ... can't wait to get them some use! -
Added step in back seat to not tear vinyl seams
JJOcean replied to InfinitySurf's topic in Centurion Boats General Discussion
Definitely need to post some pics when she is all done! -
Appreciate the heads up. It was on my list to replace my mushroom anchor - just waiting for a deal. Pulled the trigger. Thanks.
-
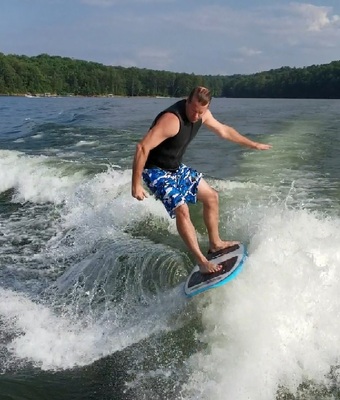
Congrats! Very nice board. Jeff built me a 4'10" Voodoo ... finally got it about a month ago and only have been able to get out on it a couple times, but it is awesome. Certainly the favorite of the boards I have.
-
Boat Pulling Left After Rudder Swap
JJOcean replied to JJOcean's topic in Centurion Boat Maintenance, Performance, Troubleshooting
Yeah, it isn't right. Confirmed that with dealer & Fineline today. A new actuator and bolt/washers/nut is in the process of getting ordered. Hopefully, that change out will correct the issues. The rudder still may need a little tuning, but my CATS needs to be fixed and is certainly masking if I need to tune the rudder. Only a matter of time before the eyelet on the actuator completely gave out. -
Boat Pulling Left After Rudder Swap
JJOcean replied to JJOcean's topic in Centurion Boat Maintenance, Performance, Troubleshooting
Ok, so I pulled the floor up early this morning to get a good look at the CATS. There clearly is some play in the CATS as you can see from the video below. If I push out the play by hand the CATS fin is aligned. However, in the shorter position of the play (where the system moves it to) it is not aligned. The reason for the play is that the bolt and nut that holds the arm on the other end (opposite the CATS fin side) is completely loose. The nut and bolt is on there – it just isn’t anywhere close to being tightened down. It has at least .75” – 1” of travel from the bolt head to the nut. I’m assuming that bolt and nut should be tightened down to prevent the horizontal movement??? I also don’t think that the nut and bolt that are currently on there is OEM because the diameter seems smaller than it should (has a lot of play within the hole) and if I did tighten down the nut, I’d have at least 1” of excess thread sticking above the nut. That space is real tight, so I’d doubt Fineline would spec the bolt that long. The plastic housing where the bolt goes through doesn’t appear to be cracked like I’ve seen on a couple other posts, but it is pretty hard to see given the tight quarters – I just felt around it with my fingers on the parts I couldn’t see. I also didn’t tighten down the bolt today because I don’t think the bolt is OEM. My plan is to get the OEM bolt/nut, replace what’s there and tighten it down properly. I also plan to get a replacement arm just in case. I plan to examine the current arm when I replace the existing bolt/nut to check it for cracks. Given the play that exists, I’m sure there’s been some abnormal stress on it. Any other suggestions or opinions on next steps vs. my plan?